Destination Tab
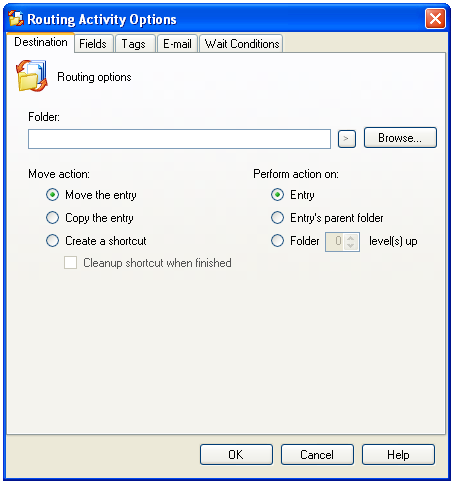
This  tab contains routing options for the Route Entry to Group activity. All settings in this tab must be configured.

Note: Before configuring this tab or reading this help topic, we recommenced that you read Trustee Provider Configuration.
To open the Destination tab
- Add the Route Entry to Group activity to your workflow definition by dragging it from the Toolbox Pane and dropping it in the Designer Pane.
- Select the activity in the Designer Pane.
- Under Routing Options in the Properties Pane, click any of the
 setting's icons to open the Routing Activity Options dialog box. This box consists of six tabs:
- Select the Destination tab.
To configure the Destination Tab
- Choose one of the following.
- Route to user folder(s): From the drop-down box, select whether All Users should receive every routed entry or if entries should be routed evenly among group members (Round Robin).
- Route to group folder
- Route to folder: Routes the entry to a specific folder in the repository. Click Browse to specify a folder or manually enter a folder path. Entries can only be moved to a location in the repository specified. Click
 to use tokens.
- Optional: Click Use custom folder(s) for this activity to route entries to users or groups via custom folders (i.e., folders that have not been specified as the user's or group's default working folder). This option will only apply to the current activity and will not affect the user's default working folder. This option is not available if you select Route to folder above. Click Configure to assign a custom folder. In the Folder Mapping dialog box, click Add. Next to Provider, select the Laserfiche repository or Active Directory containing the desired user or groups. Next to Search Value, enter a search term (e.g., a user's name). Click Search. If a match is found, the user or group will appear under Properties. Once a user or group is found, click OK. Next to Folder, click
 to browse to a custom folder or manually enter a folder path. Click
  to use tokens. Click OK when you are done.
- Optional: Click Configure default user or group folders to define default user or group property token values.
- Under Move action, select the type of action to be taken.
- Moving the entry will relocate it.
- Copying the entry will duplicate the entry.
- Creating a shortcut will place a shortcut to the entry at the destination specified. Select Cleanup shortcut when finished for the shortcut to be deleted at the completion of the workflow.
- Under Perform Action On, select which entry this activity will be performed on.
- Select Entry to perform this activity on the entry that starts the workflow.
- Select Entry's parent folder to perform this activity on the folder that contains the entry that starts the workflow.
- Select Folder _ level(s) up to perform this activity on a folder that is a parent, but not the immediate parent, of the entry that starts the workflow. Enter the number of levels desired.
 Give me an example.
Example: If the Finances folder contains the Tax Documents folder, and the Tax Documents folder contains the 2007 Taxes document, the Finances folder is a parent, but not an immediate parent, of the 2007 Taxes document. In this example, the Finances folder is two levels up from the 2007 Taxes document.
 tab contains routing options for the Route Entry to Group activity. All settings in this tab must be configured.
 tab contains routing options for the Route Entry to Group activity. All settings in this tab must be configured.
 setting's icons to open the Routing Activity Options dialog box. This box consists of six tabs:
 to browse to a custom folder or manually enter a folder path. Click
  to use tokens. Click OK when you are done.
 Give me an example.